This post contains affiliate links. Please see our disclosure policy.
The question I’m asked most often is, “How do you make a sourdough starter?” While the process can feel intimidating at first, it’s actually very doable, even for beginners. To create a loaf with deep, complex flavor and a beautifully chewy crumb, you need a strong and reliable starter. I use a 50/50 blend of rye flour and unbleached all purpose flour to encourage steady fermentation and balanced flavor. Let’s build yours together.

Sourdough Starter
Making bread from scratch is so satisfying and working with dough is the ultimate form of baking therapy. There are so many ways to make a sourdough starter, I am going to share with you my method.
A starter, also referred to as levain, is a fermented dough made with flour and water. The mixture transforms into a live culture that ferments creating a natural yeast. The lactobacilli that form in the starter create a lactic acid that gives sourdough bread its signature sour taste.
Best Flour For Sourdough Starter
I prefer to begin with whole grain rye flour because it’s rich in nutrients and natural yeasts, which helps kickstart the fermentation. Rye tends to activate faster than many other flours, making it especially helpful for beginners who want to see steady progress. If you don’t have rye on hand, whole wheat flour is a great alternative.
As your starter becomes established, you can gradually transition the flour to suit your baking style. I transition mine to a 50/50 blend with rye and all purpose flour after a few days. Or you replace the rye entirely with all purpose flour for a milder flavor.
Sourdough Starter Tools
- Two Glass Jars
- I prefer to use wide mouth glass jars, as the are easier to see the fermentation bubbles of the starter, easier to clean, and the wide top makes stirring simpler.
- You can use large mouth Mason Jars or Weck Glass Jars to house your starter. Have two jars on hand for transferring between feedings.
- Kitchen Scale
- Baking is an exact science and the accuracy needed for measuring your flour and water are imperative for a happy starter. Weighing everything in grams will result in a better outcome than eye balling a measuring cup that may or may not have packed down ingredients. Pick up a cheap digital kitchen scale to keep for all your future baking needs.
- Silicone Spatula
- Stirring with a small rubber spatula in my opinion is easier than using a spoon. The shape is flat, so it nicely runs across the inside of the jar and helps break up clumps.
- Rubber Band or Marker
- I like to wrap a rubber band around my jar to mark the level of my starter after feeding. This way I can monitor how much it has risen in between feedings. A dry erase marker will also work.
- Optional Starter Home (not mandatory)
- I purchased a sourdough start home by Brod & Taylor for my sourdough starter to love inside. My kitchen is all windows and I have a tiny French fridge. Using this house allows me to control the temperature more precisely. I only recommend this if you plan on baking a lot of bread or want to make the investment.
- This is not necessary and you can totally keep yours on the counter. I
Creating a Sourdough Starter
Feeding a starter is not as tedious as you might think. I’ve made several different types of starters in the past and found a once daily feeding to be the easiest to maintain as someone who bakes bread weekly. It only takes about 5 minutes to feed, which is a quick task to guarantee a healthy sourdough starter.
The rye blended culture is pretty resilient. If you miss a feeding or accidentally feed later than needed, don’t panic, most of the time it comes back to life without any issues.
The sign of a healthy starter is active fermentation and that classic sour smell! Meaning it rises and falls regularly after a feeding. It takes anywhere from 8 days to 2 weeks to create a healthy starter. When you feed the starter, the yeast and bacteria in the culture will metabolize the sugars in the flour, creating gasses that cause the starter to rise. Yay for bubbles and yeast. Let’s get started!
NOTE: It can take up to 2 weeks, sometimes even a little longer, for a sourdough starter to become fully active. Every kitchen is different, and so is every jar of flour and water. You’re essentially cultivating wild yeast, and like anything alive, it doesn’t always follow a strict schedule. If yours seems sluggish, don’t panic and give it time. Stay consistent with your feedings, and trust that this is completely normal.
Sourdough Starter Feeding Schedule
Day 1
Begin your feeding in the morning, so you can eventually add a second evening feeding for bread making. The ratio is 1:1, meaning equal parts flour and water.
- Place an empty jar on your scale and tare so that the scale reads zero with the jar.
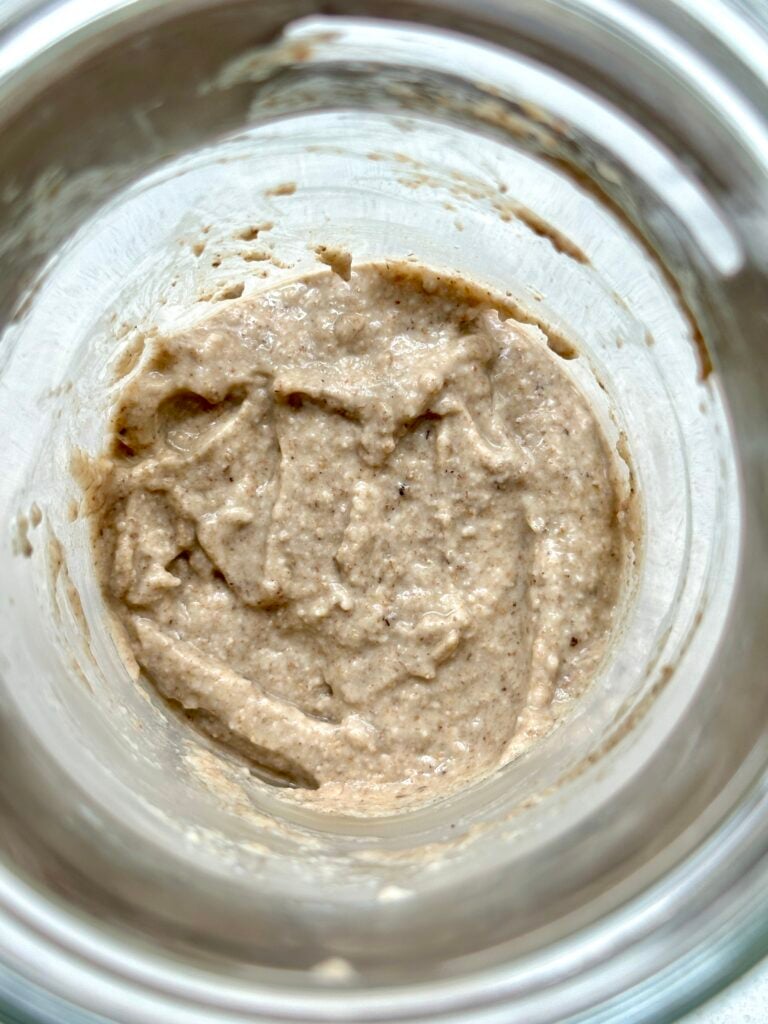
- Spoon in 60 grams rye flour, then pour in 65 grams warm water 78°F (26°C).
- Stir with small rubber spatula until all clumps of flour are incorporated into a thick paste.
- Set the lid of the jar loosely on top. Don’t screw it on tightly to allow gas to escape as needed.
- Place the jar in a draft free location in your kitchen. I prefer to set my starter jar on a kitchen towel to prevent the cool counter top from affecting the temperature.
- Keep the jar away from direct sunlight and let sit for 24 hrs.
- If using a sourdough home, set the temperature to 78°F (26ºC).
Day 2
No Feeding!
- Take a peek, you may see some activity with a few bubbles, you may not.
- Don’t worry if you don’t, sometimes the bubbles have already come and gone overnight.
- In the first few days, it may smell a bit funky. Like alcohol, cheese, or soured laundry. Totally normal!
- Give it a little stir and let rest for 24hrs.
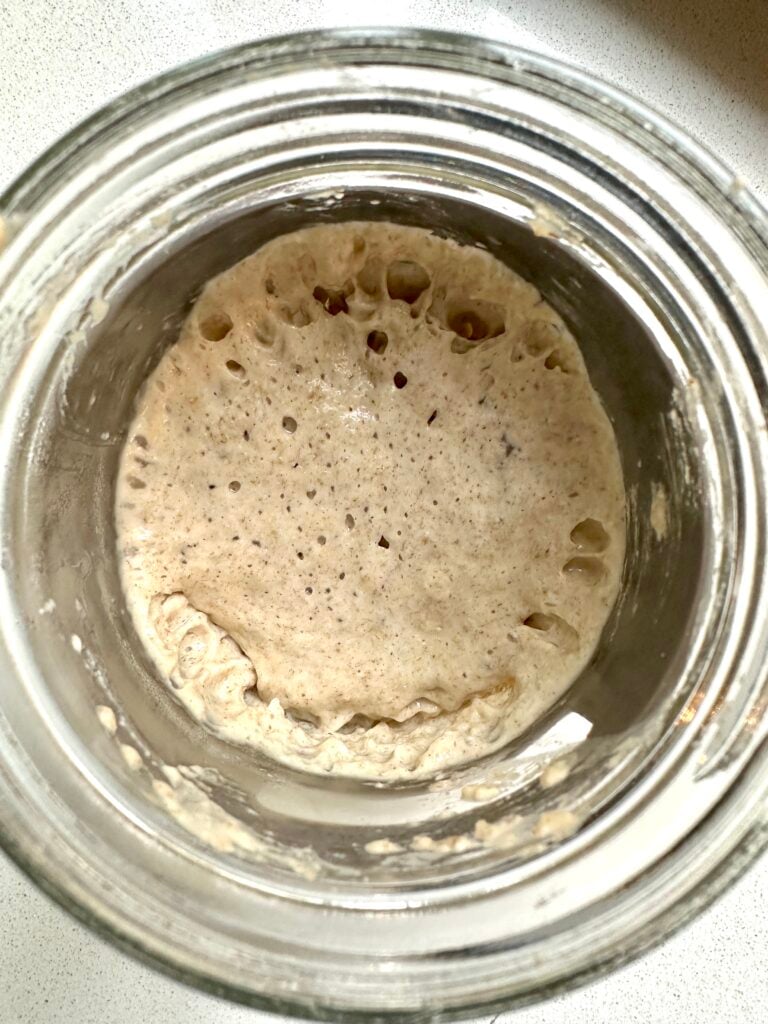
Day 3 – False Rise
The starter may look active or may only have minimal changes. You may notice a huge growth, referred to as a “false rise”. Which often leads to a quiet starter on the fourth and fifth day, but it will come back. It may also be very stinky! Today we are going to incorporate all purpose flour.
The feeding ratio is a 1:1:1, meaning 1 part fermented starter, 1 part flour, and 1 part water, all measured by weight.
- Place the clean jar on the scale and tare to zero.
- Give your overnight starter a soft stir.
- Add 60 grams of the 24 hr overnight mixture into the empty jar.
- Plus 30 grams rye flour and 30 grams all purpose flour to the jar.
- Pour in 60 grams warm water 78°F (26°C) stir until well mixed.
- Place loosely lid on the jar and set it back on counter to rest for 24 hrs.
Discard the rest of the mixture in the first jar and clean it in preparation for the next day. The discard is not yet ready for use in other recipes and at this time needs to be thrown in the trash.
Day 4-14
Most starts become quiet during days 4-6, meaning little to no activity. Please don’t get discouraged. This is when the bad bacteria from the first few days have chilled out and the good yeast is beginning to do its thing.
The feeding ratio is now changing to a 1:2:2, meaning 1 part fermented starter, 2 parts flour, and 2 parts water, all measured by weight.
- Continue with a 1:2:2 feeding every 24 hrs
- Place 40 grams of the 24 hr overnight mixture into the empty jar.
- Add 40 grams rye flour and 40 grams all purpose flour to the jar.
- Pour in 80 grams warm water 78°F(26°C) stir until well mixed.
- Place lid loosely on the jar and set back on counter to rest.
Discard the rest of the mixture in the first jar and clean it in preparation for the next day. Using a clean jar at every feeding helps to prevent possible mold growth.
Day 15 and Continuing
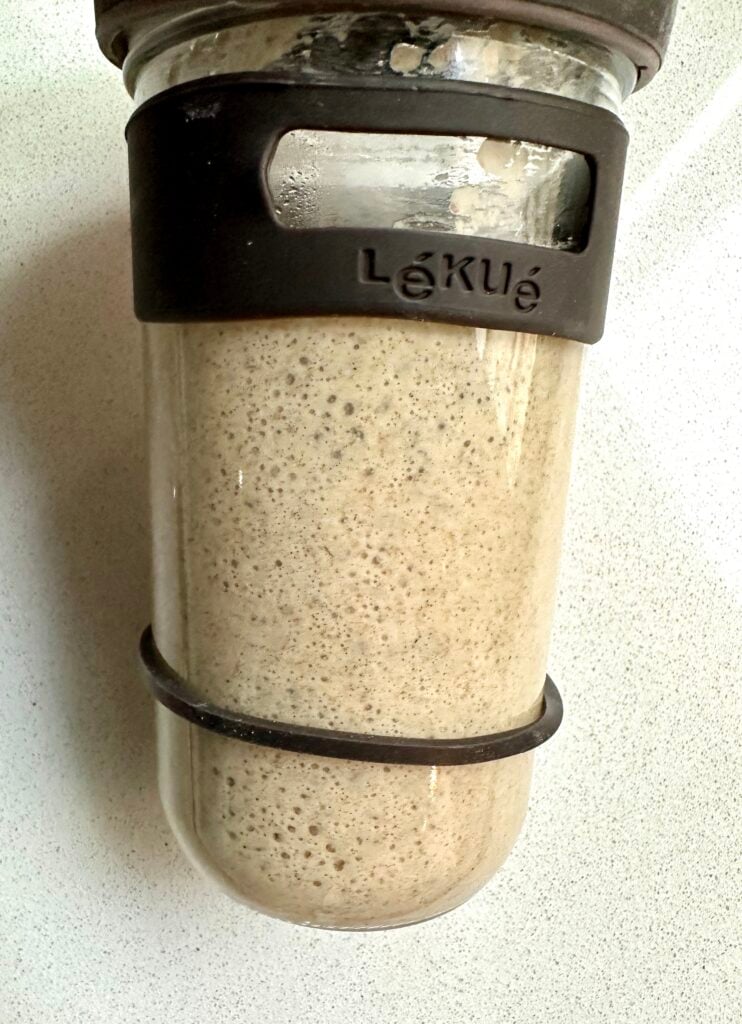
You should now be seeing plenty of activity with your starter. Notice the rise and fall streaks inside the jar.
- A healthy active starter will produce small bubbles easily visible on the surface and sides of the jar.
- It should smell pleasant and slightly tangy.
- The texture will be airy and fluffy.
A portion of your healthy starter is now ready to be used for baking recipes.
If for some reason you aren’t seeing lots of activity, keep feeding your starter on a schedule. This may be due to the type of flour you are using or the temperature in your kitchen. Check to make sure its not getting too cold.
Smell Your Starter
Your nose is one of the best indicators of your sourdough starter’s health. A mature starter should smell pleasantly tangy and slightly sweet, never rotten or strong like nail polish.
A Healthy Sourdough Starter Smells Like:
- Lightly tangy or a bit like yogurt (sometimes I think it smells like a potato)
- Slightly fruity (green apple, pear, banana)
- Mildly yeasty or bready
- Clean and fresh with a gentle acidity
A Hungry Sourdough Starter Smells Like:
- Sharply acidic
- Like vinegar
- Like nail polish remover (acetone)
This happens when the natural yeasts and bacteria have scarfed all their available food. To fix, just discard and give it a fresh feeding. After one or two regular feedings, the smell should return to a pleasant tanginess.
Ripe and Ready to Use
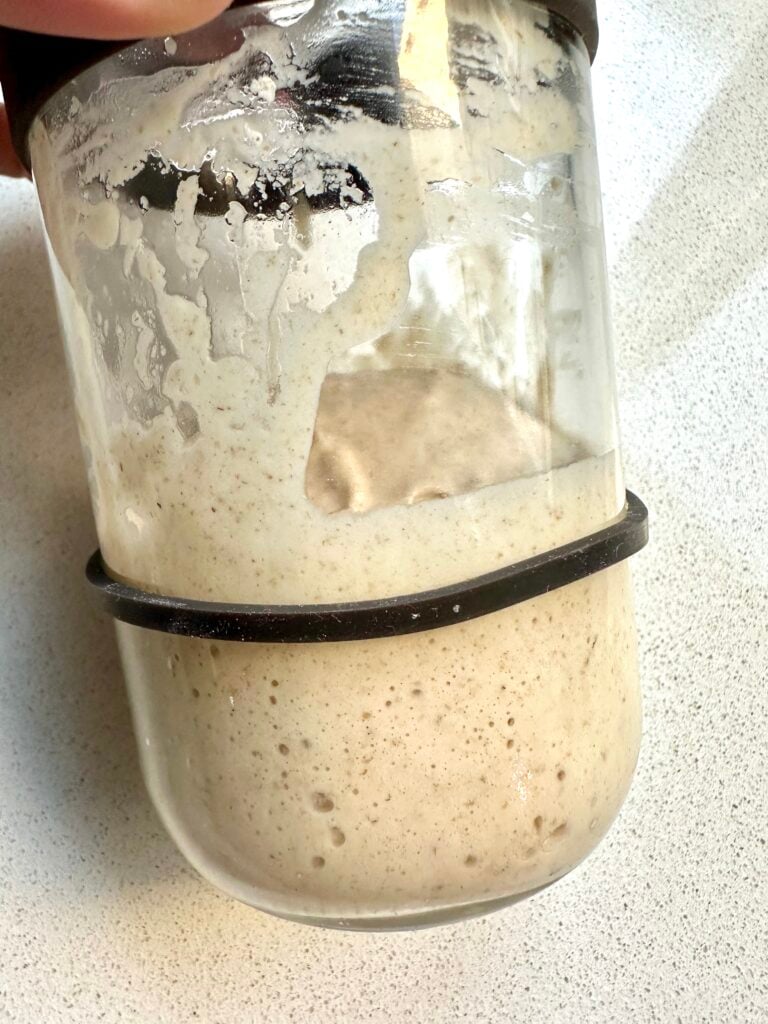
A ripe sourdough starter is simply a starter that has fermented long enough after feeding to be ready for baking. You can use it to build a levain or mix it directly into your dough. When it’s ready, it will have risen, look airy and bubbly across the surface and sides of the jar, smell pleasantly sour, and have a loose texture.
Because I maintain my starter at a 1:2:2 ratio, it behaves like a liquid starter with close to equal parts flour and water (about 90–100% hydration). When it’s ripe, you’ll notice plenty of bubbles and visible aeration throughout. If you gently stir it or pull back the top layer, you’ll feel how the structure relaxes and brakes down. This is exactly what you want to see before baking.
Common signs your starter is ripe and ready to be used:
- Noticeable rise
- Bubbles on top and along the sides
- A clean, sour aroma
- Loose consistency
Alternatively, if your starter is very runny, or liquidy that doesn’t rise much or has an acetone odor it may need less hydration. Swap the feeding to a 1:2:1 ratio, start with 40g of starter, add 80g of flour and 40g of water for a while to bring it back.
Maintenance Feeding for a Sourdough Starter
Once your sourdough starter is mature and consistently active, you can maintain it based on how often you bake. Keep it at room temperature for frequent baking, or store it in the refrigerator if you bake less often.
Room Temperature (Feed Every 24 Hours)
- If you’re baking regularly, keep your starter at room temperature and feed it a 1:2:2 ratio once every 24 hours:
- Discard all but 20 grams of starter.
- Add 20 grams rye flour and 20 grams all purpose flour.
- Pour in 40 grams warm water (78°F / 26°C) and stir until fully combined.
- Scrape down the sides of the jar so you can easily monitor its rise.
- This schedule keeps your starter strong, active, and ready to bake with at any time.
Refrigerator (Feed Once a Week)
- If you’re not baking daily, the refrigerator is perfect for slowing things down.
- Feed your starter using your normal maintenance ratio. Let it rest at room temperature for 2–3 hours, just until you see the first signs of fermentation. Once it’s showing early activity, place it in the fridge.
- A refrigerated starter only needs to be fed once per week to stay healthy.
Before Baking with a Refrigerated Starter
When you’re ready to bake, remove the starter from the refrigerator and let it come to room temperature. Give it a maintenance feeding and leave it at room temperature until it’s active and bubbly again. Usually this take 1-2 days, then use it in your recipe.
If I’m actively baking bread, I prefer to keep my mature starter at room temperature. But if I’m taking a bread break or heading out of town, the fridge works beautifully.
About That Brown Liquid (Hooch)
You may notice a brownish liquid forming on top of your starter while it’s stored in the refrigerator. It can smell quite strong or alcoholic. This is a sign your starter needs feeding, not that it’s ruined. Simply pour it off before stirring, measuring, and feeding as usual.
Easy Rye Sourdough Starter for Beginners

Equipment
- 2 16 oz glass jars with wide mouth and lid
- thermometer
- small spatula
- rubber band
- Brod & Taylor Surdough Home optional
Ingredients
- rye Flour
- all purpose flour
- filtered or bottled water
Instructions
Day 1 – 1:1 ratio
- Place one clean jar on the kitchen scale and tare to zero. Add 60 grams rye flour and 65 grams warm filtered water (80ºF). Stir to mix completely into a wet paste. Place the rubber band around the jar to mark the top of the mixture. Cover loosely with the lid (don't screw on tight). Place jar in a warm (76-78º F) place for 24 hours.
- I'm using my Brod&Taylor starter house at 78℉ (26℃).
Day 2 – Rest
- Stir the mixture with a small spatula, but do not feed. Cover loosely with the lid and place jar in a warm (76-78º F) place for 24 hours.
Day 3 – First Feeding Day – 1:1:1 ratio
- Place a clean jar on the scale and tare to zero. Give your overnight starter a soft stir and pour 60 grams of the 24 hr overnight mixture into the empty jar. Discard the remaining in the trash. Add 30 grams of rye Flour and 30 grams all purpose flour to the jar. Pour in 60 grams of warm water 80°F(26°C) stir until well mixed. Cover lightly with the lid (don't screw on tight) and mark with rubber band. Place jar in a warm (76-78º F) place for 24 hours.
- Note: You will probably notice a surge of activity on day 2 or 3 that dies down to nothing in the following days. This is totally normal, the starter is not ready to use just yet. Stick with the process and keep feeding.
Day 4-14 (1:2:2 feeding ratio)
- Place a clean jar on the scale and tare to zero. Give your overnight starter a soft stir and pour 40 grams of the 24 hr overnight mixture into the empty jar. Discard the remaining in the trash. Add 40 grams rye flour and 40 grams all purpose flour to the jar.
- Pour in 80 grams warm water 78°F(26°C) stir until well mixed. Cover lightly with the lid (don't screw on tight) and mark with rubber band. Place jar in a warm (76-78º F) place for 24 hours.
- When the starter is doubling in size after each feeding for several continuous days it is ready to use in a bread recipe.