This post contains affiliate links. Please see our disclosure policy.
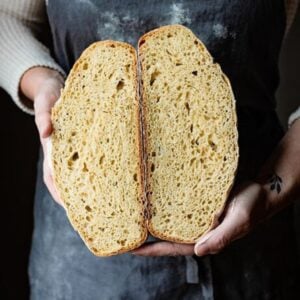
A classic loaf bread with a soft, moist, and flavorful center is exactly what you get with this Dutch Oven Artisan Bread Recipe. No stand mixer or heaving kneading required, just a little stretching followed by folding, mixed in with some patience while the dough rests is all that’s required. A good bread takes time, so don’t rush the process and you’ll be savoring this delicious loaf in no time!

Key Ingredients & Test Notes
- Bread Flour (12.5-13% protein) provides the strong gluten structure needed for an airy, chewy loaf with beautiful oven spring. Its higher protein content allows the dough to hold its shape while developing a lovely crumb and golden crust.
- Test Note: I prefer King Arthur Bread Flour for consistent results, it gives a strong, elastic dough that’s easy to work with and bakes up beautifully.
- All-Purpose Flour (11-11.7% protein) softens the texture of the bread, balancing the chewiness of the bread flour. It adds tenderness and a lighter bite without compromising structure.
- Test Note: Blending the two flours creates a dough that’s easy to handle while still producing a bakery-quality crust and crumb.
- Warm Water (100–110°F) hydrates the flour and activates the yeast. This high hydration level gives the dough its characteristic stickiness and helps create large, irregular air pockets once baked.
- Test Note: Use water that’s pleasantly warm to the touch (it shouldn’t burn your finger), too hot can kill the yeast, while too cold will slow fermentation.
- Kosher Salt enhances flavor, strengthens gluten development, and balances the yeast activity.
- Active Dry Yeast works slowly, allowing for full flavor development during the resting and folding stages.
- Test Note: Be sure your yeast is fresh, if it doesn’t foam after being mixed into warm dough, it may be expired. You can also substitute instant yeast in equal amounts for a slightly faster rise. Just toss the instant yeast into the flour mixture, no need to activate it first.

Hydrated Dough
How do you create such a crunchy crust with a moist center? Well, that comes from a well hydrated dough that is finished in a dutch oven. I’m talking jiggly, wavy full of air pockets and super fun to play with dough. The kind you have to cradle and gently shape somewhat like a soft water ballon.
Helpful Tips
- Check to make sure you have banneton or bread proofing basket and a 3.5 qt dutch oven.
- Weigh your ingredients! Bread measurement must be exact for a successful bake, so no eye balling the amount of flour.
- Sift your flour.
- Lightly flour your hands while working with the wet dough to help with it sticking to you.
- Don’t forget to preheat your dutch oven before transferring in the dough. The super hot pot is ideal for baking your loaf.
- To prevent burning yourself, flip the dough from the proofing basket onto a sheet of parchment paper (seam side down), then lower the dough into the dutch oven by holding the ends of the parchment paper.
- I find the extra layer of parchment paper prevents the bottom of my loaf from getting too dark. Of course this is totally up to you, if you want to drop it in by hand.
- Once the loaf is settled into the dutch oven, use your hand gently to reshape if needed.


Leftovers & Storage
Room Temp: Store the baked loaf in a sealed paper bag at room temperature for 3-5 days.
★★★★★ Please leave a star rating and review below if you make this recipe! THANK YOU!!
Dutch Oven Artisan Bread
Ingredients
- 600 grams (4.73 cups) bread flour, 12.7% protein
- 200 grams (1.58 cups) all purpose flour, 11.7% Protein
- 665 grams (2.77 cups) warm water, (100 -110℉)
- 20 grams (3 tablespoons) kosher salt
- 4 grams (1.25 teaspoon) active dry yeast
Instructions
- Sift flours into a large mixing bowl and pour in the water. Using your hands to work the water into the flour until completely combined. Dough will be very wet and sticky. Let mixture sit for 10 minutes.
- Evenly cover the dough with salt and yeast. Then, grab the dough stretching out and upward then folding over the center. Working your way around the dough, adding in a few squeezes to help evenly distribute the yeast and salt. Mix the dough this way for 4-5 minutes. Scrape excess dough from your hands.
- Cover the bowl with a kitchen towel and let sit for 20 minutes.
- Remove towel, then stretch and fold the dough 6-7 times.
- Cover dough again and let rest for 60 minutes, then stretch and fold dough 6-7 times.
- Place kitchen towel back on bowl and place in a draft free warm location and let sit until tripled in size, 1-2 hours..
- Lightly dust working surface with bread flour and pour dough out of bowl onto working surface. Dough will be sticky and jiggly, so handle with care.
- Dust your hands and top of loaf with bread flour. Then carefully fold dough over itself into thirds, 4 times. The dough will start to take shape as you mold it with your hands into a large round ball. The seam will be on the bottom.
- Dust a proofing basket with flour and gently transfer dough into the basket. Cover with kitchen towel and let rest for 1 hour.
- Halfway through resting time, preheat Oven to 475 F (245 C) and place a 3.5 qt dutch oven on middle rack.
- The next step can be done in two ways. Remove the hot dutch oven from the oven. Then, either flip the dough from the proofing basket onto a sheet of parchment paper, then carefully lower the dough into the hot dutch oven by holding the edges of parchment paper. Or flip onto counter and the lower by hand. Be careful since the dutch oven is hot. Make sure the seam side of the dough is on the bottom. Reshape in pot as needed.
- Place lid on the dutch oven and return to middle rack of oven. Bake for 50-55 minutes or until crust is golden brown. Check at the 45 minute mark.
- Remove dutch oven and place on counter for 15 minutes with lid off. Then remove loaf and let sit on a cooling rack for additional 10 minutes before slicing.
Notes
- All Purpose: King Arthur Flour 11.7% protein
- Bread Flour: King Arthur Bread 12.7% protein
*Recipe adapted from Chef Billy Parisi Artisan Bread.


You know that no-knead bread recipe everybody made during lockdown. That’s fine and easy, but if you’re ready to take it to the next level, this is the one! Good bread takes time and this is a great step for the bread making newbie, like me;) This is a good weekly recipe for days when you’ve got chores around the house and then reward yourself with homemade bread.